Computer Forum
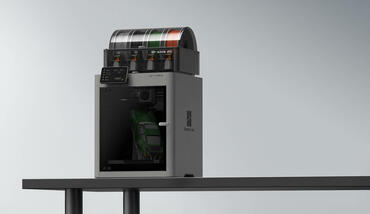
What the P2S does even better than the P1S
The new P2S is intended to build on the success of the P1S and do a few things better. The P2S has a similar feature set to the much more expensive X1C from Bambu Lab. Now that we have had the P1S in operation for a year and have become accustomed to the printer's services, the new features of the P2S are clearly noticeable right from the start. In addition to quality-of-life upgrades, there are improvements at almost all levels. In addition, the complete package of the P2S including AMS 2 is often advertised at an even more aggressive price, which means that the P1S is currently still being sold for €399 (Affiliate) and these are probably residual improvements. At a price point of 585 € (Affiliate), the P2S is therefore slightly more expensive, but is significantly cheaper than the X1C and with the AMS 2 as P2S Combo costs €642 to €735 (Affiliate).
 Bambu Lab P2S Combo Test Review (Image © PCMasters.de)
Improvements on the inside
From a purely technical point of view, Bambu Lab has opted for an improved extruder that is easier to change. The standard extruder with 0.4 mm thickness is probably the sweet spot for most prints and materials. Even though the print bed and print volume remain the same and enable prints with a maximum size of 256 x 256 x 256 mm, a lot has happened on the inside. What is immediately noticeable is the improved light inside, which provides much better print room lighting than the P1S. The new camera also impresses with significantly better quality and should also detect misprints.
 Bambu Lab P2S Combo Display Menü Druckerstatus (Image © PCMasters.de)
New touch display
We also see a significant upgrade in the included display. With the P1S, this was rather pointless for us, as we only used it for debugging and status queries. With the P2S, however, a 5" panel with 854x480 px resolution is part of the package and it's quite something. Not only is it colorful, it also finally offers an alternative to the software, because if you want to print STL or other files, you can also coordinate this well via the display. It also displays much more information and provides a good still point for interaction with the printer.
 Bambu Lab P2S Combo AMS 2 Innenaufbau (Image © PCMasters.de)
AMS 2 Pro vs. AMS 1
We ordered the package with the AMS 2 Pro because there have also been some changes in filament management. You can still load up to four rolls of filament, but now you can read out the temperature and humidity inside the AMS 2 Pro in the software, which is extremely important when printing with materials such as ABS. Another new feature is that the AMS 2 Pro can be used via an additional power cable to dry the inner chamber and therefore the filament! This used to require separate devices. The better control of temperature and humidity reduces warping during printing, which minimizes failures. You can also connect another AMS or AMS 2 Pro to the P2S if you are printing in multiple colors. The P2S always changes the filament automatically for multi-color printing and stops if there are any problems. Bambu Lab has now really perfected the system.
 Bambu Lab P2S Combo Verpackung (Image © PCMasters.de)
Packaging and scope of delivery
It can be said right away that you can buy the P2S online without hesitation, because the packaging is designed exactly for this purpose and is very well thought out. With the P1S at the time, we only had one transport damage to the knob of the front glass, everything else was undamaged and the replacement part is available as an STL for download from Bambu Lab. So that wasn't a problem either. We found absolutely no damage to the P2S after delivery.
 Bambu Lab P2S Combo Werkzeugpaket (Image © PCMasters.de)
The scope of delivery is not limited to the essentials, as there are additional parts as well as tools, even though the P1S had more gimmicks to sweeten the printing fun and several hot ends. The P2S came with heat transfer paste and hot-end covers as well as scraper parts so that you can print the corresponding component and use it directly. Overall, we would classify the scope of delivery as good and the packaging as excellent.
 Bambu Lab P2S Combo Drucker sicherung (Image © PCMasters.de)
Bambu Lab P2S assembly
As explained above, Bambu Lab has gone the extra mile with the transportation sicing. All moving parts are secured with either styrofoam, clamps, reinforced tape or cable ties. You rarely see anything like this!
 Bambu Lab P2S Combo seitlich (Image © PCMasters.de)
 Bambu Lab P2S Combo unten (Image © PCMasters.de)
After opening the actual box from the top, you are immediately confronted with the accessories and manual. The manual makes it easy to assemble and disassemble the parts, and there are also videos to simplify the process.
 Bambu Lab P2S Combo Lieferung Zubehör 1 (Image © PCMasters.de)
Interior preparation
You then remove the top polystyrene cover and are instructed to pull the printer up by the plastic bag while holding on to the protruding film on the right and left. This process is easy and, in our opinion, can be done without outside help.
 Bambu Lab P2S Combo TopGlaspanel (Image © PCMasters.de)
All components are glued with a reinforced film. The adhesive tapes must be removed from the top and sides. This first removes the upper glass panel, which is protected again in a plastic bag. It is pleasing to note that the adhesive tapes leave no adhesive residue and are easy to remove.
 Bambu Lab P2S Combo Top Glaspanel ausgepackt (Image © PCMasters.de)
You can also completely remove the film from the top glass panel at this point, or do it later. The assembly continues on the inside.
 Bambu Lab P2S Combo Innenpolstrung AMS2 (Image © PCMasters.de)
The AMS 2 Pro and the accessory box are located directly under the upper top glass plate. This has been placed inside as one part and anchored there.
 Bambu Lab P2S Combo AMS2 Sicherung (Image © PCMasters.de)
Styrofoam spacers are located on four sides and hold the accessories and the AMS 2 Pro in place. You have to remove these first, but the AMS 2 Pro is still screwed in at the bottom.
 Bambu Lab P2S Combo Front Tür (Image © PCMasters.de)
The tempered glass front door must also be freed from the adhesive strips and then the plastic bag, after which you can access another polystyrene holder, which must also be removed.
 Bambu Lab P2S Combo Schraubsicherung lösen (Image © PCMasters.de)
At the bottom, the AMS 2 is held in place by two screws, which are circled in orange. In general, all the important parts for installation are marked in orange. The Allen key is included in the package and is used here.
 Bambu Lab P2S Combo Kabelbinder (Image © PCMasters.de)
Then remove the AMS, three more polystyrene holders and then unscrew the plastic holder at the bottom that holds the heatbed in place. Three screws are removed for this. The heatbed is held in place at the end by a screw at the very back, which we also unscrew.
 Bambu Lab P2S Combo Polsterung und Sicherung (Image © PCMasters.de)
Freeing the Z-axis struts
The struts for the heatbed are also secured again by two red plastic buffers. These plastic buffers can be pulled out, after which the heatbed can be moved.
 Bambu Lab P2S Combo Stopper lösen (Image © PCMasters.de)
Then remove the three cable clamps at the back that hold the extruder and the X-Y axis in place.
 Bambu Lab P2S Combo Stopper entfernt (Image © PCMasters.de)
Extruder and X-Y axis
Then remove the three cable clamps at the back that hold the extruder in place.
 Bambu Lab P2S Combo Extruder lösen (Image © PCMasters.de)
 Bambu Lab P2S Combo Zubehörbox (Image © PCMasters.de)
Display assembly
The next step is to pull out the large accessory box containing the display. It is stowed in a plastic bag and needs to be removed. The actual connection is really simple and is also shown on the back of the display with pictures.
 Bambu Lab P2S Combo Display Box (Image © PCMasters.de)
The flat connection cable sticks out of the upper left front, which must be plugged into the display in the correct orientation. Once this is done, the display can be inserted into the holding device, after which it is secured.
 Bambu Lab P2S Combo Displayanschluss (Image © PCMasters.de)
 Bambu Lab P2S Combo Display eingehakt (Image © PCMasters.de)
 Bambu Lab P2S Combo AMS2 (Image © PCMasters.de)
AMS 2 Pro installation
Now we can turn our attention to the AMS 2 Pro, which can be placed next to or on top of the printer. We usually place it on top, which seems most convenient. There are some tubes in the accessory box that are used to connect the AMS 2 to the printer.
 Bambu Lab P2S Combo Rückseite (Image © PCMasters.de)
The filament is pushed through the tubes and two AMS or one AMS with a side mount can be combined as standard via the central hub on the back. The latter has the disadvantage that the filament simply hangs in the room and is exposed to the humidity and temperature of the room. The holder is included, but we have left it out.
 Bambu Lab P2S Combo AMS 2 Tubing (Image © PCMasters.de)
In our scenario with an AMS 2 Pro, we connect a total of two tubes that are already the perfect length. You simply insert them into the openings on the hub. Another tube comes out of the hub, which can then be found with the yellow connector at the top of the printer. A connection cable also comes from the AMS 2 Pro, which is used to communicate with the printer. This is simply connected to one of the two sockets on the hub.
 Bambu Lab P2S Combo Dessicant (Image © PCMasters.de)
The AMS2 itself also needs some work. After opening the lid, remove the polystyrene layer and then the Selica bags on the back. The Selica bags are packed in plastic and must then be freed from this and stored in the AMS2 in order to bind the moisture.
Bambu Lab P2S Combo AMS 2 Innenaufbau (Image © PCMasters.de)
As soon as everything is connected and the AMS2 is ready, you can start the P2S and begin the setup via the display.
 Bambu Lab P2S Combo Einrichtung (Image © PCMasters.de)
Installation and setup of the P2S
After starting, you will be asked for the language and then the region. You confirm everything by pressing the green "Next" button at the top right. The touch panel is fast and fairly precise.
 Bambu Lab P2S Combo Kalibierung (Image © PCMasters.de)
After selecting the WLAN and entering the WLAN password, the printer can be accessed and further configured via the WLAN.
The terms and conditions must be confirmed and then a connection with the BambuHandy app must be established by scanning the QR code. You then link the printer to your Bambu Lab account and have to go through the rest of the setup process.
After naming the printer, you will be asked further questions on the display. After confirmation, the first calibration can begin, which should take about 26 minutes.
 Bambu Lab P2S Combo Kalibierungsvorgang (Image © PCMasters.de)
 Bambu Lab P2S Combo Kalibierung vollendet (Image © PCMasters.de)
 Bambu Lab P2S Combo Display Menü Home (Image © PCMasters.de)
Control via display
It was possible to control the P1S via the display, but it was slow and cumbersome, which is why you give up pretty quickly. This is different with the P2S, because the higher resolution and touch input actually make operation very pleasant.
 Bambu Lab P2S Combo Display Menü Vorlagen (Image © PCMasters.de)
The Home menu provides general information about the printer status. Here you can also go directly to the AMS and see how many file elements are in the AMS. Access to the files is also available here at the touch of a button. There are some useful projects that can be started directly here. Others can be reloaded. The SD card slot of the P1S is omitted and instead you have a USB port for USB sticks, for example.
Bambu Lab P2S Combo Display Menü Druckerstatus (Image © PCMasters.de)
Under the settings you can already see a lot of information about the printer and can also adjust parameters directly on the printer, including temperatures, fan speed, etc.
 Bambu Lab P2S Combo Display Menü AMS 2 Status (Image © PCMasters.de)
In the submenu for AMS, you can also adjust the filament settings directly on the printer and see which filament has just been loaded. The rolls also allow the printer to read out how much filament is left and display this visually. Bambu Lab's filament rolls all have RFID chips, allowing the printer to recognize the filament directly and select the correct settings for the material. This is incredibly convenient.
 Bambu Lab P2S Combo Display Menü Druck vollendet Info (Image © PCMasters.de)
After a print or in the event of errors, the display shows help or information that can help you directly. This is also exemplary.
 Bambu Lab P2S Combo Verarbeitung (Image © PCMasters.de)
BambuStudio Software
If you buy a Bambu Lab 3D printer, it is best to work directly with BambuStudio. The tool is free, standardized for all printers and is really very detailed. There are often patches and extensions. The manufacturer tries everything to remove any limitations - it must be made clear that this version is bound to Bambu Lab Clloud and that the transfer with the printer is also done via the Internet. This gives you the advantages and disadvantages of a cloud connection. For critical environments, there are more expensive versions of the printers that also run without the cloud, but for home users and small businesses, this version is simply the best.
 BambuStudio Software Druckeinstellungen (Image © PCMasters.de)
After a year of testing, we are convinced by the software. It's better to create your technical designs with other software that you can handle well (Autodesk Fusion or Blender). But when it comes to printing, slicing and print preparation, BambuStudio is simply the best solution.
In the beginning, it is difficult to find your way around because there are so many options, but Bambu Lab has a solution here too: BambuLab Academy! You learn about the printer and also about the software, watch videos and texts, then take a short exam for each chapter and receive certificates and points that you can use for MakerWorld.
 BambuStudio Software Druckübersicht (Image © PCMasters.de)
If you only want to print other people's projects, the integrated search function at MakerWorld will get you a long way, as you will usually find finished projects with print instructions that have already been tried and tested. Often there are also photos and information from others in the community.
 BambuStudio Software Übersicht (Image © PCMasters.de)
You can also load other STL or CAD projects and then print them in parts or multicolored via BambuStudio.
In the event of errors, there is a link to the website next to the error code, which often explains solutions to errors with videos.
 Bambu Studio App Fehlerbehandlung (Image © PCMasters.de)
Another new feature of the P2S is the detection of spaghetti and misprints. These can be activated and the sensitivity can also be adjusted again. This is a help if you print at night.
 Bambu Studio App P2S Spaghetti Detection (Image © PCMasters.de)
 Bambu Lab P2S Combo vs P1S Combo (Image © PCMasters.de)
BambuLab P2S experience report - print quality and print projects
Due to our long experience with the P1S, on which we tried out a lot and primarily focused on higher quality printing, we approached the P2S with high expectations.
The build experience was even better than with the P1S. Compared to the small 3D printers, which you have to assemble by hand from individual parts, the P2S is a completely different caliber when finished with a closed housing. The assembly was without any frustration and bordered on fun. The setup was also easy and if you are already in the Bambu Lab ecosystem with an account and experience with the software, operation is a breeze. What's more, we have also had good experiences with the original heat plate, as we don't use any glue or apply anything to the bed. The adhesion is always very good and you only sometimes have to clean the plate with rubbing alcohol. The fact that the plate is removable makes working with the P2S very easy.
 BambuStudio Software App Steuerung (Image © PCMasters.de)
We also have no problems with BambuStudio, everything was great. The better camera and the stronger homogeneous light also made short checks in between on the smartphone a good experience.
In print mode, the P2S is often clearly audible, but not excessively loud. The fans can also be turned down considerably if necessary. If the components get too hot, the printer automatically turns the fans up, but usually it leaves the fan speed low because that is sufficient - the closed housing is an advantage here.
 Bambu Lab P2S Combo Testdruck 2 (Image © PCMasters.de)
There is only one nozzle, which is why "poop" inevitably comes out of the back of the printer. You have to live with this and can collect and recycle these remnants if you want to.
 Bambu Lab P2S Combo Testdruck Standard (Image © PCMasters.de)
 Bambu Lab P2S Combo Standard Layering (Image © PCMasters.de)
If you don't switch on "Ironing" in BambuStudio, the transitions between the layers are rough. They can be sanded away or reworked afterwards, or you can print directly with the ironing option, but this way the printing takes longer. However, the results are always much smoother and nicer - that's why we only print with this option
 Bambu Lab P2S Combo Testdruck zweifarbig (Image © PCMasters.de)
 Bambu Lab P2S Combo Pooptower (Image © PCMasters.de)
 Bambu Lab P2S Combo Zubehörbox Druck (Image © PCMasters.de)
We like the quality-of-life improvements of the P2S, which is why we would always recommend this printer. With the AMS 2 Pro, the printer is a powerful solution that can print a wide range of materials and can also print more professional products and mockups. The reliability of the P2S is high and we have encountered far fewer problems than with the P1S.
 Bambu Lab P2S Combo Installation (Image © PCMasters.de)
Conclusion on the Bambu Lab P2S
The new P2S from Bambu Lab is a real asset for those who want to print models more frequently with the 3D printer. The new touch display makes interacting with the printer even more pleasant and the new interior lighting and high-resolution camera ensure better monitoring of the print, even on the go from a smartphone. The cloud connection is a must and unfortunately you have to accept this unless you are willing to go for the more expensive stand-alone Pro devices.
Printing and debugging is excellent with the P2S. Especially in combination with the new AMS 2 Pro, printing multiple materials and/or colors is a breeze. The automation is exemplary. With an additional power supply unit, the AMS 2 Pro can even dry the filament and the humidity and temperature are displayed in the software. Even though the maximum print volume remains the same, new filters, ventilation and improvements at every nook and cranny give us the impression that the P2S has been raised to a higher class without increasing the price.
Anyone looking for an open and affordable 3D printer will certainly not go for the P2S. The P1S is obsolete and sells for €399 (Affiliate) and the P2S is positioned in a competitive price segment at €519 (Affiliate). This makes it far more expensive than the open 3D printers that you have to assemble yourself, but it also plays in a different league. We see the price as more than reasonable for what you get, especially as it is on a par with the more expensive X1C. However, we would always recommend buying the P2S with the AMS 2 Pro, which is available as a P2S Combo for 642 € to 749 € (Affiliate), because this combination offers you so much more.
Pro
- Very user-friendly
- Comprehensive software
-
AMS 2 Pro for multi-color printing and printing function
- Very comprehensive app control via PC and smartphone
- Very good interior lighting and camera
- Error detection via camera
- Closed housing with ventilation and filter
- Good price-performance ratio
- Great material support
Contra
- Cloud connection obligation
- Filament ideally from BambuLab