Computer Forum
 ASUS ROG Crosshair X870E HERO Test Review (Image © PCMasters.de)
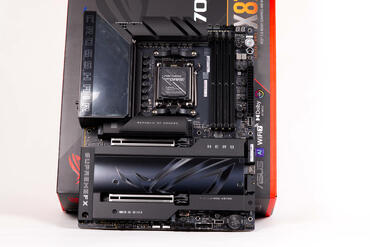
ASUS ROG CROSSHAIR X870E HERO in detail
The ROG CROSSHAIR has been ASUS's most advanced motherboard series for years and is particularly popular with overclockers and enthusiasts. Over the years, ASUS has continued to develop features that are too expensive and petty for the normal series, but are the quality-of-life improvement that enthusiasts are looking for. The scope of delivery is probably the largest that ASUS has to offer for motherboards. The box is also correspondingly pompous and large.
With the ROG CROSSHAIR X870E HERO we take a look at the latest iteration of the series and do our best not to forget important details, but there are simply too many of them. With the BIOS alone, you can spend hours poring over the options and researching what the individual parameter changes do.
Like all current AM5 motherboards with the AMD 800 series, the ROG CROSSHAIR X870E HERO also supports all processors of the Ryzen 7000, Ryzen 8000G and Ryzen 9000 series, including the X3D models.
 ASUS ROG Crosshair X870E HERO Rückseite (Image © PCMasters.de)
From unpacking to installation and operation, you can see the attention to detail in this board. The board is also quite heavy due to the many extras and is also supplied with a solid backplate. The cover appears to be made of aluminum and is very elaborately decorated and coated in matt and glossy paint. When removing the back cover, you can also see that there are thick thermal pads around the base to allow heat transfer to the back cover.
 ASUS ROG Crosshair X870E HERO ARGB ROG Cover (Image © PCMasters.de)
In addition to the socket, there is once again a cover over the voltage converters, which covers the cooler and has a great visual effect. It doesn't look very special when switched off, but as soon as the mainboard is supplied with voltage from the power supply, this area lights up brightly. The ROG lettering becomes visible with many vertical lines. At first glance, this looks like a display, but it is not. The lighting is then controlled via the software and can be synchronized with other components via the ARGB headers.
 ASUS ROG Crosshair X870E HERO IO Panel (Image © PCMasters.de)
Inputs & outputs and extras
ASUS has also gone the extra mile with inputs and ports, offering workstation-like connectivity in a consumer form factor.
What the I/O panel delivers
On the I/O panel with fixed shield, Das Boards offers two modern USB4 ports with 40 Gbps bandwidth and eight 10 Gbps USB ports (six Type A, two Type C), providing enough throughput for fast external SSDs, recording devices and professional peripherals. Screen output is via HDMI, while audio is provided via an optical S/PDIF connection and gold-plated analog sockets. However, HDMI output is only available on CPUs with an integrated iGPU and most buyers of this board will probably not use the port, but it's nice that it's there just in case.
Networking options include an RJ45 socket for Realtek 5 GbE, plus another with Intel 2.5 GbE for secondary LAN and integrated Wi-Fi 7 for multi-gigabit WLAN in congested environments. Ease of maintenance is ensured by the BIOS FlashBack and Clear CMOS buttons for hassle-free firmware recovery. These are all features buyers have come to expect from this board.
 ASUS ROG Crosshair X870E HERO HEADER Anschlüsse unten rechts (Image © PCMasters.de)
The connections on the board itself then offer an extension of two 20 Gbit/s USB-C ports, one of which supports QC4+ fast charging, so that modern cases can have large ports on the front.
 ASUS ROG Crosshair X870E HERO HEADER Anschlüsse unten (Image © PCMasters.de)
 ASUS ROG Crosshair X870E HERO SATA und USB Header (Image © PCMasters.de)
Five NVMe plus SlimSAS
The integrated storage is unusually generous: Five M.2 Key M slots offer space for several PCIe SSDs, supplemented by four SATA 6 Gb/s for mass storage drives. A SlimSAS connector supports PCIe 4.0 x4, enabling enterprise-style cabling to U.2/U.3 devices or breakout backplanes without occupying a PCIe slot.
 ASUS ROG Crosshair X870E HERO EPS Stecker (Image © PCMasters.de)
Power supply, fan and cooler
Power is supplied via a 24-pin ATX connector with two 8-pin EPS connectors for the CPU and an additional 8-pin PCIe connector to stabilize configurations with high power consumption.
 ASUS ROG Crosshair X870E HERO 80 POST LEDs (Image © PCMasters.de)
Cooling connections include CPU, CPU OPT, AIO pump, W_PUMP+ and four fan connectors in the chassis, allowing detailed control of the coolers and chassis.
 ASUS ROG Crosshair X870E HERO Switche und mehr (Image © PCMasters.de)
The fine extras
The quality of life features are aimed at frequent tweakers and benchmarkers:
- Start and ReTry buttons for open-bench tests
- PCIe mode switch to fine-tune slot behavior and compatibility
- FlexKey (user assignable case key function)
- Thermal sensor header for loop or case probes
- LN2 mode jumper to stabilize extreme sub-zero sessions
- Three ARGB Gen2 headers for addressable lights
- Front panel audio and a 10-1 system panel header for clean chassis integration
- Port 80 post LEDs that show the status of the boot process.
Wifi 7
Wi-Fi 7 is being introduced with the new generation of many ASUS boards, including the PRIME X870-P WIFI (test). ASUS promises speeds that are up to 4.8 times faster than Wi-Fi 6, as well as a toolkit that should reduce latency and failures in practice.
Two key changes account for the jump in throughput:
- 320 MHz channels in the 6 GHz band: Where regulators allow, Wi-Fi 7 can double the channel width available for Wi-Fi 6E, creating much wider data channels for multi-gigabit connections. Availability depends on local frequency regulations.
- 4K QAM modulation: By packing more bits per symbol than the 1024-QAM used in Wi-Fi 6/6E, 4K-QAM can increase peak data rates by about 20%, provided signal conditions are good enough.
The third pillar is Multi-Link Operation (MLO), which is a switch from single-band sessions to simultaneous multi-band connections over 2.4, 5 and 6 GHz. MLO can aggregate bandwidth for greater throughput and dynamically route traffic to reduce latency spikes when one band is congested.
The new antennas from ASUS are also included in the scope of delivery. These are simply plugged into the connectors in the I/O panel on the back and are ready for use. This "WiFi Q antenna" from ASUS integrates two transceivers that cover 2.4/5/6 GHz and ensures better signal quality and greater range with directional sensitivity. Compared to the previous generation of antennas, ASUS claims an increase in reception of up to 6% at 6 GHz and up to 18% at 5/2.4 GHz, helping to maintain higher order modulation such as 4K QAM in typical homes and offices.
 ASUS ROG Crosshair X870E HERO DDR5 RAM Slots (Image © PCMasters.de)
AMD EXPO and DDR5 memory tuning
For memory, there is the previous maximum in the form of four DDR5 UDIMM slots, which operate in dual-channel mode and support both non-ECC and ECC UDIMM RAM with a total capacity of up to 256 GB. Enthusiasts can load AMD EXPO profiles right out of the box to achieve DDR5-8600 (OC), while experienced tuners can get even more out of it with detailed UEFI controls for timings, voltages and memory training.
The DRAM slots also look good at first glance. ASUS relies on NitroPath DRAM technology here, which optimizes the electrical and mechanical aspects of the DIMM interface:
- Shorter gold contacts (-70%) and optimized signal paths are intended to reduce impedance discontinuities and crosstalk, thus improving stability at extreme data rates.
- A more stable locking mechanism and rail geometry increase the holding force by 57%, which is useful for frequent kit changes on open-bench or test loop systems.
- The company claims an effective frequency increase of up to +400 MT/s over conventional slot designs, providing additional headroom for high-bin DDR5 kits.
For RAM that does not support EXPO, the ASUS Enhanced Memory Profile (AEMP) can be used to improve performance.
 ASUS ROG Crosshair X870E HERO oberer NVMe Slot (Image © PCMasters.de)
NVMe slots
The modern NVMe slots play an important role and ASUS has rolled out everything the portfolio has to offer. Limited by the chipset, or both chipsets, there are three NVMe slots here, which are connected with PCI-Express 5.0 via 4 lanes. These also tend to get warm, which is why all slots on the board are covered by coolers without exception. These PCIe 5.0 NVMe slots also support NVMe SSDs in lengths of 42, 60 and 80 mm (full length).
 ASUS ROG Crosshair X870E HERO NVMe Slots (Image © PCMasters.de)
PCIe 5.0 NVMe slots offer a bandwidth of up to 128 Gbps, which would correspond to 16 GB/s data transfer rates. These theoretical data transfer rates were almost achieved in practice in our test with the Crucial T705, as we measured transfer rates of more than 14 GB/s.
 ASUS ROG Crosshair X870E HERO NVMe Kühler (Image © PCMasters.de)
 ASUS ROG Crosshair X870E HERO NVMe Kühler seitlich (Image © PCMasters.de)
In addition, the top NVMe slot is equipped with a tool-free mountable cooler, which is particularly large. The top three NVMe slots are also equipped with an aluminum cooling element on the mainboard side, to which thermal pads are attached. All you have to do is peel off the blue foil and you're ready to go.
 ASUS ROG Crosshair X870E HERO ROG NVMe Kühler (Image © PCMasters.de)
The lowest NVMe slots are then connected to PCI Express 4.0 x4 lanes, which can also deliver decent performance. PCIe 3.0 is dispensed with completely. The PCIe 4.0 NVMe slots offer speeds of 64 Gbps in this configuration, which enables a maximum of 7.877 GB/s. The slots are all equipped with plastic brackets, which is why all SSDs can be attached quickly without tools. This solution has proven to be very practical and robust.
 ASUS ROG Crosshair X870E HERO ROG NVMe Kühler mit Pads (Image © PCMasters.de)
The removable cooler has a stylish design and covers all four lower NVMe slots. Four thermal pads are attached to the inside. In places where an SSD is installed, the protective film should be removed beforehand so that the heat transfer is unhindered.
 ASUS ROG Crosshair X870E HERO Phison Controller (Image © PCMasters.de)
There are also four Phison PS7101 PCIe 5.0 2-lane mux/demux redrivers on the back of the board.
As can be seen in the diagrams, the transfer rates were high and came close to the limits of the interfaces.
MEASURED VALUES
 ASUS ROG Crosshair X870E HERO Spannungsversorgung (Image © PCMasters.de)
Robust power design
ASUS emphasizes power integrity and uses a wide VRM layout that is made for next-generation Ryzen and sustained overclocking. The design is based on an 18+2+2 phase configuration that combines high current DrMOS stages with robust input and output filters to reduce voltage drops during short and long workloads.
The core power supply is based on 18× SiC850A DrMOS (110 A each), with two additional SiC850A (110 A) stages dedicated to SOC/VCCGT. The auxiliary power rails (VDD_MISC/VCCSA/VCCAUX) are supplied by 2× SiC629 DrMOS (80 A). Phase management is provided by an ASP2205 (XDPE192C3B) controller, a proven digital PWM that enables precise transient response and granular switching control.
Each stage is coupled with MicroFine alloy chokes rated at 45A, selected for their low core losses and reduced noise level at high switching frequencies. Downstream, 10K black metal and solid polymer capacitors boost the input/output filters to keep ripple under control and ensure stability at elevated temperatures common in compact designs and vertical graphics card layouts.
Each stage is coupled with MicroFine alloy chokes rated at 45A, selected for their low core losses and reduced noise at high switching frequencies. Downstream, 10K black metal and solid polymer capacitors boost the input/output filters to keep ripple under control and ensure stability at elevated temperatures common in compact designs and vertical graphics card layouts.
 ASUS ROG Crosshair X870E HERO Spannungsversorgung 2 (Image © PCMasters.de)
The two 8-pin ProCool II EPS connectors provide the VRM with a reinforced, low impedance path to the CPU socket. The improved housings and tighter pin fit are designed to prevent hotspots on the connectors.
 ASUS ROG Crosshair X870E HERO SpaWa Kühler (Image © PCMasters.de)
The coolers on the VRMs are also large and optimized for the use case. It is particularly interesting that thermal pads are also attached to the housing of the WIFI connections, which is apparently intended for cooling these.
 ASUS ROG Crosshair X870E HERO IO SHield mit Wärmeleitpaste (Image © PCMasters.de)
 ASUS ROG Crosshair X870E HERO Hauptkühler unten (Image © PCMasters.de)
The top cover is detachable from the actual two coolers, which are made of aluminum and painted black. The build quality is of a high standard. The two coolers on the voltage converters are also connected to each other via heat pipes. Heat conducting pads are fitted at the necessary points.
 ASUS ROG Crosshair X870E HERO ASmedia ASM4242 (Image © PCMasters.de)
ASMEDIA SM4242
ASUS focuses on connectivity with the ROG Crosshair X870E HERO and needs a dedicated controller with so many next-gen USB ports. The ASMEDIA SM4242 USB4 host controller is used here as well as on other X870 boards from ASUS. This chip is the board's traffic director, consolidating PCI Express and DisplayPort signals into two USB-C (USB4) downstream ports while monitoring signal integrity with an integrated USB4 router, PCIe switch and DisplayPort retimer.
Each USB4 port supports protocol tunneling, meaning simultaneous transmission of USB, PCIe and DisplayPort, allowing a single cable to power high-speed storage, external GPUs/chassis that rely on PCIe tunneling and multi-display configurations. Thanks to Thunderbolt 3 compatibility and backward compatibility with USB 3.2 Gen 2x2, peripherals can achieve up to 40 Gbps connection speeds.
On the motherboard side, the ASM4242 connects via a PCIe 4.0 x4 upstream interface at approximately 16 Gb/s per lane to ensure the controller does not become a bottleneck when multiple devices rely on PCIe tunneling or when large transfers max out the bus. This headroom benefits NVMe storage docks, recording devices and other PCIe-based accessories that benefit from sustained throughput.
 ASUS ROG Crosshair X870E HERO Spannungsversorgungskühler seitlich (Image © PCMasters.de)
Cooling the chip
USB4's 40 Gbps connections and multi-protocol tunneling generate waste heat, so the controller is covered by the large cooler, which also covers the voltage converters. This ensures that the controller can always operate reliably and unthrottled.
 ASUS ROG Crosshair X870E HERO Sockel AM5 (Image © PCMasters.de)
X870 compared to previous generation
With a jump in the naming scheme from 600 to 800, one would expect obvious innovations, but everything is different with this generation. You have to look carefully in the table to see the differences. In the 600 series, there were only minor differences between the X670 and X670E chipsets, but the X870 seems to be more clearly differentiated from the X870E. Above all, the X870E offers more support for USB ports and has more PCIe 5.0 lanes. Nevertheless, X870 boards are equipped with full PCIe 5.0 lanes, which the X670 chipset still lacked.
 ASUS ROG Crosshair X870E HERO X870X CHipsatz (Image © PCMasters.de)
The ROG Crosshair X870E HERO not only has one chipset, but two. They are at the same height and are covered by a large cooler.
 ASUS ROG Crosshair X870E HERO Chipsatz im Doppelpack (Image © PCMasters.de)
| X870E | X870 | X670E | X670 | |
| Socket | AM5 | AM5 | AM5 | AM5 |
| PCIe lanes (graphics card) | 1x PCIe 5.0 ×16 or 2x PCIe 5.0 ×8 | 1x PCIe 5.0 ×16 or 2x PCIe 5.0 ×8 | 1x PCIe 5.0 x16 or 2x PCIe 5.0 x8 | 1x PCIe 4.0 x16 or 2x PCIe 4.0 x8 |
| PCIe 5.0 lanes (total) | 44 | 36 | 44 | 44 |
| PCIe 5.0 Lanes (CPU) | 24 | 24 | none | 20 |
| PCIe 5.0 Lanes (NVMe) | 4 | 4 | 4 | 4 |
| PCIe 4.0 lanes (chipset) | 12 | 8 | 12 | 12 |
| PCIe 3.0 lanes (chipset) | 8 | 4 | 8 | 8 |
| PCIe 4.0 lanes (CPU) | 24 | 24 | 24 | 4 |
| USB SUPERSPEED 5Gbps | 2 | 1 | 2 | 2 |
| USB SUPERSPEED 10Gbps | 12 | 6 | 12 | 12 |
| USB SUPERSPEED 20Gbps | 2 | 1 | 2 | 2 |
| USB 4.0 support | present | present | optional | optional |
| SATA ports (or PCIe 3.0) | 8 | 4 | 8 | 8 |
| Overclocking | Supported | Supported | Supported | Supported |
| AMD EXPO | Supported | Supported | Supported | Supported |
| Integrated WLAN | Wi-Fi 7 | Wi-Fi 7 | Wi-Fi 6E | Wi-Fi 6E |
| Chipset TDP | 14 W | 7 W | 14 W | 14 W |
 ASUS ROG Crosshair X870E HERO Verpackung (Image © PCMasters.de)
Packaging
The user experience of the ROG Crosshair X870E HERO starts with the box and ASUS tries to package the product lavishly and suggest that a lot is delivered here. The box is wide and large, but also contains a lot of accessories.
 ASUS ROG Crosshair X870E HERO Verpackung offen (Image © PCMasters.de)
The box is opened like a box from the front. The top of the inner box is black and reveals some information about the board that ASUS considers essential. The actual mainboard is covered by a plastic cover.
 ASUS ROG Crosshair X870E HERO Lieferumfang (Image © PCMasters.de)
Scope of delivery
The scope of delivery is by no means standard and includes many extras as well as cables and extra parts. The following is included:
- 1 x ARGB RGB extension cable
- 4 x SATA 6 Gb/s cables
- 1 x ASUS WiFi Q-antenna
- 1 x Q-connector
- 2 x M.2 Q-Latch package
- 3 x M.2 Q-Slide package
- 5 x M.2 rubber package
- 1 x ROG sticker
- 1 x ROG thank you card
- 1 x ROG bottle opener
- 1 x USB flash drive with utilities and drivers
- 1 x Quick Start Guide
Technical data
| ASUS ROG CROSSHAIR X870E HERO - technical data | |
| Form factor | ATX |
| Socket | AMD AM5 / LGA1718 |
| CPU support | Ryzen 7000, Ryzen 8000G, Ryzen 9000 |
| RAM slots | 4x DDR5 DIMM, Dual Channel, UDIMM (Non-ECC+ECC), max. 256GB (UDIMM) |
| EXPO profile (maximum) | DDR5-8600 |
| Ports (I/O panel) | 1x HDMI 2.1 (iGPU), 2x USB4 with DisplayPort 1.4a (40Gb/s, PD-Out 15W, iGPU), 2x USB-C 3.1 (10Gb/s), 6x USB-A 3.1 (10Gb/s), 1x Toslink S/PDIF Out (Realtek ALC4082), 2x 3. 5mm jack (Realtek ALC4082), 1x RJ-45 (5GBase-T, Realtek), 1x RJ-45 (2.5GBase-T, Intel I226-V), 2x antenna connection Quick Connect |
| PCIe slots | 2x PCIe 5.0 x16 (1x x16, 1x x8) [x16/x0 or x8/x8] |
| M.2 slots | 3x M.2/M-Key (PCIe 5.0 x4, 2280/2260/2242), 1x M.2/M-Key (PCIe 4.0 x4, 2280/2260/2242), 1x M.2/M-Key (PCIe 4.0 x4, 2280), 1x M.2/E-Key (2230, occupied with WiFi+BT module) |
| Connections Header connections | 2x USB 3.2 header Key-A (20Gb/s, 2x USB-C), 2x USB 3.0 header 20-pin (5Gb/s, 4x USB-A), 2x USB 2.0 header 9-pin (480Mb/s, 4x USB-A) |
| PWM fan connectors | 2x CPU fan 4-pin PWM, 4x fan 4-pin PWM, 1x AIO pump 4-pin PWM, 1x pump 4-pin PWM, 1x thermal sensor header |
| ARGB connections | 3x 3-pin ARGB (+5V/DATA/GND, max. 3A, ASUS Gen2) |
| Audio | Realtek ALC4082, ASUS SupremeFX |
| Network | Realtek (5Gb/s), Intel I226-V (2.5Gb/s) |
| Wireless standards | Wi-Fi 7 (WLAN 802.11a/b/g/n/ac/ax/be, 2x2), Bluetooth 5.4 |
| VRM | 18+2+2, 20 virtual CPU phases (2x9+2x1), 10 real CPU phases (9+1) |
| MOSFETs | 18x 110A SiC850A (DrMOS),2x 110A SiC850A (DrMOS) |
| Warranty | 3 years |
| Price | €590 (Affiliate) |
ROG CROSSHAIR X870E HERO: CPU support
According to ASUS, the board supports the following processors:
- Ryzen 9 9950X3D
- Ryzen 9 9950X (test)]6**
- Ryzen 9 9900X3D
- Ryzen 9 9900X (test)
- Ryzen 7 9800X3D (test)
- Ryzen 7 9700X (test)
- Ryzen 5 9600X
- Ryzen 5 9600
- Ryzen 9 7950X3D
- Ryzen 9 7950X (test)
- Ryzen 9 PRO 7945
- Ryzen 9 7900X3D
- Ryzen 9 7900X
- Ryzen 9 7900
- Ryzen 7 7800X3D (test)]11**
- Ryzen 7 PRO 7745
- Ryzen 7 7700X
- Ryzen 7 7700
- Ryzen 5 PRO 7645
- Ryzen 5 7600X3D
- Ryzen 5 7600X (Test)]12**
- Ryzen 5 7600
- Ryzen 5 7500F (test)
- Ryzen 5 7400F
- Ryzen 7 PRO 8700GE
- Ryzen 7 PRO 8700G
- Ryzen 7 8700G
- Ryzen 7 8700F
- Ryzen 5 PRO 8600GE
- Ryzen 5 PRO 8600G
- Ryzen 5 8600G
- Ryzen 5 PRO 8500GE
- Ryzen 5 PRO 8500G
- Ryzen 5 8500GE
- Ryzen 5 8500G
- Ryzen 5 8400F
- Ryzen 3 PRO 8300GE
- Ryzen 3 PRO 8300G
- Ryzen 3 8300GE
- Ryzen 3 8300G
 ASUS ROG Crosshair X870E HERO BIOS Main (Image © PCMasters.de)
BIOS
For a motherboard of this class, the comprehensive BIOS is an important part of the overall package and ASUS gives the buyer access to pretty much everything the BIOS option palette has to offer. The number of options is overwhelming and many of the options require some reading to understand exactly what they do. The overclocking options in particular are very deep and have further submenus, which in turn have submenus.
The deeper you go, the less description you find for the options, which is why you have to research differently, as the voltages and features become more and more technical and require a deeper basic understanding. But this is precisely what makes the board so appealing: you can tweak settings that hardly any other manufacturer reveals. The settings are usually adjusted at driver and firmware level and you don't get to see the options.
 ASUS ROG Crosshair X870E HERO BIOS Favoriten (Image © PCMasters.de)
Otherwise, the BIOS is structured in the same way as we are used to from ASUS. You land in an EZ mode and then switch to the Advanced Mode or back. The first tab is always "My Favorites", where you will find the most frequently used options. This can be helpful, but is not grouped and can therefore appear chaotic.
 ASUS ROG Crosshair X870E HERO BIOS Monitor (Image © PCMasters.de)
Under the "Monitor" tab you will find sensor data and their monitoring options. You can view and edit temperature data, fan speeds or switch to the voltages.
 ASUS ROG Crosshair X870E HERO BIOS Q Fan Einstellungen (Image © PCMasters.de)
Above all, "Q-Fan" is a must for anyone setting up a new system and the fan curves should always be set individually and readjusted until they are optimally adapted to your needs.
 ASUS ROG Crosshair X870E HERO BIOS Q Fan (Image © PCMasters.de)
The offsets can be adjusted in the "Monitor" area, but it is much more intuitive with the Q-Fan Control, which can be accessed by pressing the "F6" key. Here you can set the curves of the individual connections individually or define fixed speeds. You can also make improvements to the operating system later, but the highest point and the fallback are always the BIOS data.
 ASUS ROG Crosshair X870E HERO BIOS Q Dashboard (Image © PCMasters.de)
At the top we find language settings, direct access to important tools such as Q-Fan, if you don't want to press F6, you can control it with the mouse. There are also other buttons and help options at the bottom. Q-Dashboard was introduced by ASUS with the 800 series of its boards and it can help you to familiarize yourself with the board without using the manual. The tool shows you which component is connected and what kind of component it is.
 ASUS ROG Crosshair X870E HERO BIOS Boot (Image © PCMasters.de)
Furthermore, there are some options in the "Boot" tab that are also essential.
 ASUS ROG Crosshair X870E HERO BIOS Xtreme Tweaker (Image © PCMasters.de)
Extreme Tweaker
Down the Rabbit Hole: The Extreme Tweaker is one of the most complex areas in the BIOS. From the simplest options for selecting the EXPO profiles to the voltages, you can find an entry point for optimizing your system here.
 ASUS ROG Crosshair X870E HERO BIOS Extreme Tweaker Übersicht (Image © PCMasters.de)
Various voltages for RAM, chipset and CPU can already be found on the start page.
 ASUS ROG Crosshair X870E HERO BIOS Extreme Tweaker Voltages (Image © PCMasters.de)
If you want to adjust the Prevision Boost Override, you can also do this in the corresponding submenu. More options are also available under "Advanced" in the AMD OC section.
 ASUS ROG Crosshair X870E HERO BIOS Extreme Tweaker Spannungen (Image © PCMasters.de)
 ASUS ROG Crosshair X870E HERO BIOS Extreme Tweaker Spannungen tweaken (Image © PCMasters.de)
 ASUS ROG Crosshair X870E HERO BIOS Extreme Tweaker DIGI+VRM (Image © PCMasters.de)
 ASUS ROG Crosshair X870E HERO BIOS Extreme Tweaker Core Flex (Image © PCMasters.de)
In the "DIGI + VRM" submenu, further adjustments can also be made that affect the power supply. There are also load lines and switching frequencies for DRAM to CPU.
 ASUS ROG Crosshair X870E HERO BIOS Extreme Tweaker DDR Timing Control Profil (Image © PCMasters.de)
 ASUS ROG Crosshair X870E HERO BIOS Extreme Tweaker PBO (Image © PCMasters.de)
 ASUS ROG Crosshair X870E HERO BIOS Extreme Tweaker AI Features (Image © PCMasters.de)
 ASUS ROG Crosshair X870E HERO BIOS Extreme Tweaker Ai Features 2 (Image © PCMasters.de)
 ASUS ROG Crosshair X870E HERO BIOS Extreme Tweaker Tweakers Paradise (Image © PCMasters.de)
 ASUS ROG Crosshair X870E HERO BIOS Advanced (Image © PCMasters.de)
Advanced
The "Advanced" tab is also packed with functions and offers customization options for various options. This allows you to customize the built-in controllers and interfaces to your own needs, but also to call up the AMD overclocking options.
 ASUS ROG Crosshair X870E HERO BIOS Advanced AMD CBNS (Image © PCMasters.de)
Many of the options will be familiar from the server segment, where admins also like to have a hand and want to control the operating system more restrictively. Many of the options also have security aspects, such as deactivating SMT and virtualization options.
 ASUS ROG Crosshair X870E HERO BIOS Advanced CPU Config (Image © PCMasters.de)
The CPU features can be configured accordingly. These vary depending on the CPU.
 ASUS ROG Crosshair X870E HERO BIOS Advanced NBIO (Image © PCMasters.de)
If you want to adjust the PCI handling, configure GFX or audio, you can also do this under the CBS menu.
 ASUS ROG Crosshair X870E HERO BIOS Advanced PCie (Image © PCMasters.de)
Old acquaintances such as "Above 4G Decoding, Resize BAR and SR-IOV can also be found under the PCI Subsystem menu.
 ASUS ROG Crosshair X870E HERO BIOS Advanced CPU Features (Image © PCMasters.de)
If you want to define access to AVX512 and other features yourself, you can also do this.
 ASUS ROG Crosshair X870E HERO BIOS Advanced CPU (Image © PCMasters.de)
Performance and thread handling can also be tackled, which probably very few will do, but you have the option.
 ASUS ROG Crosshair X870E HERO BIOS Advanced AMD OC Disclaimer (Image © PCMasters.de)
AMD Overclocking
A considerable number of the options are grouped under "AMD Overclocking" in the "Advacned" tab at the bottom. You are forced to add a disclaimer to get to this section.
 ASUS ROG Crosshair X870E HERO BIOS Advanced OC Menu (Image © PCMasters.de)
OC fans can really let off steam here. From manual CPU overclocking to all voltages and timings, everything can be found and adjusted in the submenus.
 ASUS ROG Crosshair X870E HERO BIOS Advanced AMD OC Voltage Control (Image © PCMasters.de)
The Precision Boost Override can be adjusted in more detail here and Curve Optimized is also located here.
 ASUS ROG Crosshair X870E HERO BIOS Advanced AMD OC PBO (Image © PCMasters.de)
 ASUS ROG Crosshair X870E HERO BIOS Advanced AMD OC SoC (Image © PCMasters.de)
 ASUS ROG Crosshair X870E HERO BIOS Advanced AMD OC DDR Fabric (Image © PCMasters.de)
Tools
Last but not least: The "Tools" tab on the far right. Over the years, this tab has been given more and more functions and has accompanied the growing BIOS and allowed it to grow. The BIOS flash tool can of course be found at the top here, because you often flash the BIOS on a board like this.
 ASUS ROG Crosshair X870E HERO BIOS Tools (Image © PCMasters.de)
Secure Erase is also useful so that you can completely erase your storage media.
 ASUS ROG Crosshair X870E HERO BIOS Tools Driver Hub (Image © PCMasters.de)
Here you can also disable the rather annoying ASUS Driver HUB, which always appears in Windows and is active in the background. We see this as a security risk, because the web server/service runs in the background and usually receives little attention and love from manufacturers. This also makes it an easy risk for exploits.
 ASUS ROG Crosshair X870E HERO BIOS SPD Info (Image © PCMasters.de)
Other tools include the aforementioned Q-Dashboard and an SPD reader for DDR5 memory.
Conclusion on the ROG CROSSHAIR X870E HERO
The ROG CROSSHAIR X870E HERO from ASUS is not for the average user, let's make that clear right from the start. Anyone who sees the price of approx. 590 € (Affiliate) will come to this conclusion straight away. This AM5 motherboard is aimed at enthusiasts and of course there are now also motherboards that cost twice as much. However, ASUS has put together a well-rounded package for this target group, as the scope of delivery is really extensive and the board is also very well equipped in other respects. In addition to very extensive inputs and outputs with 5 Gbit and 2.5 GB LAN, USB C with 40 Gbit, WIFI 7 is also on board. You also get three NVMe slots, which are connected via the latest PCIe 5.0 interface and two more with PCIe 4.0. ASUS equips all NVMe slots with coolers and thermal pads ex works and the NVMe SSDs can be installed without tools in no time at all.
The board is also equipped with a backplate and large VRM coolers at the front. The DDR5 RAM can consist of either ECC or non-ECC UDIMM, with ASUS specifying DDR5-8600 (OC) as officially supported. As usual, there are 4 DIMM slots for the RAM.
The BIOS can be described as "unlocked" and you will find pretty much every option you would look for. Those expecting switches for power, reset, BIOS reset/flash and a Port80 display will not be disappointed. The board meets all our expectations and has now also become part of our 2025 GPU test platform. Apart from the price, there is hardly anything to complain about the motherboard.
Pro
- Two X870 chipsets
- Good cooling
- Three PCIe 5.0 NVMe and two PCIe 4.0 NVMe
- All NVMe slots with coolers and tool-free installation
- Sensible switches and port 80 POST dispaly
- Extremely extensive BIOS options
- Many quality-of-life features
- Good IO panel and many expansion options
- Scope of delivery
Cons
- Price, but it is an enthusiast product