
 Computer Forum
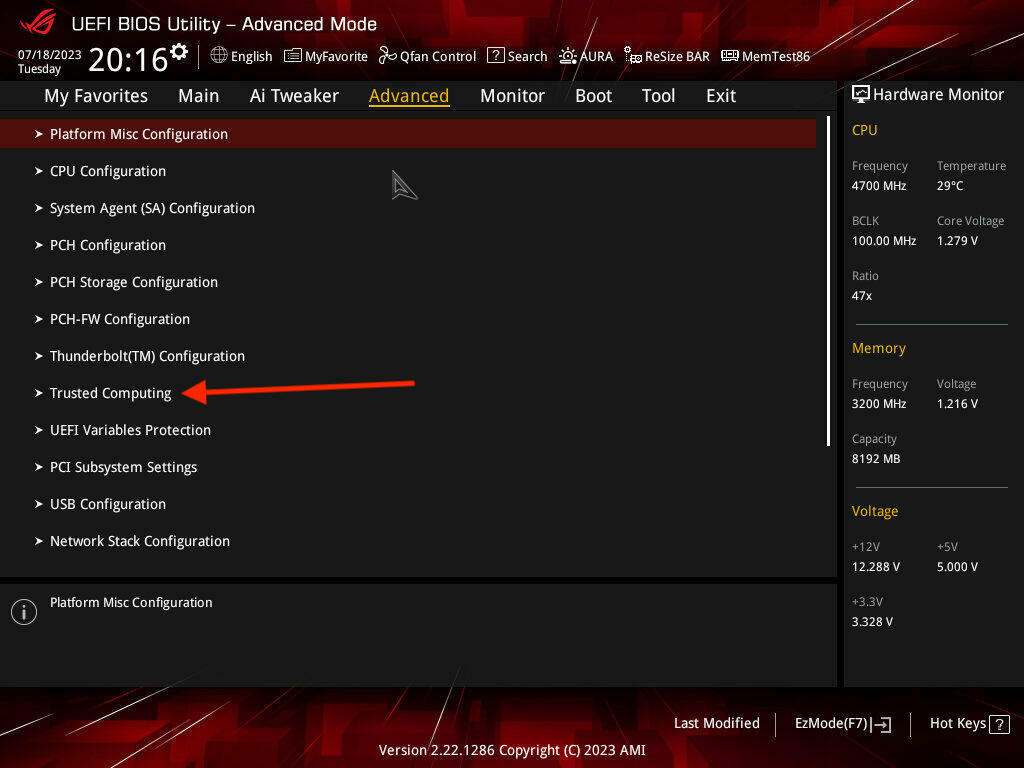 TPM 2.0 im BIOS aktivieren (Image © PCMasters.de)
Most modern PCs sold in the last three to five years are compatible with the Trusted Platform Module Version 2.0 (TPM 2.0) or are even equipped with such modules. The TPM 2.0 module is a requirement for using Windows 11 and serves as a key component for security-related features, such as storing BitLocker keys. There are workarounds to bypass this requirement, but the standard installation process requires TPM 2.0! In Windows 11, TPM 2.0 is used for various features, including Windows Hello for identity protection.
Enabling TPM 2.0
If your PC has TPM 2.0 but it isn’t enabled, you’ll need to enable it once. If you’re considering upgrading to Windows 11, you should make sure that TPM 2.0 is enabled on your computer. On many off-the-shelf PC motherboards, TPM is disabled by default in the BIOS, but it can almost always be enabled.
Option 1: Using the Windows Security app
-
Go to Settings > Update & Security > Windows Security > Device Security.
-
If you don’t see a “Security Processor” section on this screen, TPM may be disabled on your PC. For more information, see the “Enable TPM” section below or check your PC manufacturer’s support documentation. If you can enable TPM, proceed to the next step to verify that it is a TPM 2.0.
-
If the “Security Processor” section includes the “Security Processor Details” option, select it and verify that the Specification Version is 2.0. If the version is lower than 2.0, your device does not meet the requirements for Windows 11.
Option 2: Use the Microsoft Management Console
- Press [WINDOWS KEY] + R or select Start > Run.
- Type “tpm.msc” (without the quotation marks) and select OK.
-
If a message appears stating that no compatible TPM can be found, the TPM on your PC may be disabled. For more information, see the “Enable TPM” section below or refer to your PC manufacturer’s support information. If you can enable the TPM, proceed to the next step to verify that it is a TPM 2.0.
- If a message appears confirming that the TPM is ready for use, check the specification version under TPM manufacturer information to ensure it is version 2.0. If the version is lower than 2.0, your device does not meet the requirements for Windows 11.
Enable TPM 2.0 in the BIOS
-
If you first need to enable TPM in the BIOS, these settings are managed through the UEFI BIOS and may vary depending on your device. You can access these settings by selecting: Settings > Update & Security > Recovery > Restart now.
-
On the next screen, select Troubleshoot > Advanced options > UEFI Firmware Settings > Restart to make changes. These settings are sometimes located in a submenu labeled Advanced, Security, or Trusted Computing in the UEFI BIOS. The option to enable the TPM may be called Security Device, Security Device Support, TPM Status, AMD fTPM Switch, AMD PSP fTPM, Intel PTT, or Intel Platform Trust Technology.
BIOS interfaces vary greatly, but if you look carefully, you can usually find these options. Motherboard manufacturers also provide their own instructions.
Upgrading to TPM 2.0
Most motherboards have a dedicated slot for TPM modules. The modules have 12 to 20 pins and are simply plugged into the motherboard. Motherboard manufacturers such as Intel, SuperMicro, ASUS, AsRock, Gigabyte, etc., offer such modules. It’s best to check the manual to see exactly which module is compatible. Below is a list of TPM 2.0 modules:
- ASRock TPM2-S V2.0 Module (Affiliate)
- Supermicro TPM 2.0 (Affiliate)
- ASUS TPM-M R2.0 Module (Affiliate)
[end page]